AWS EC2 + Wireguard
I’m a fan of not leaving common ports like 22 (SSH) or 3306 (MySQL DB) open to the public but really like being able to access those ports from my laptop. I used to use security groups and limit access by IP to my home network. Now, most consumer internet is not static IP but I find providers like comcast do not change the IP very often, so it works for me for most of the year. I’ve recently starting using wireguard and now I’ve removed all of the security groups and my laptop can access those ports even when I’m traveling.
What is Wireguard?
The short answer is Wireguard is a VPN.
This protocol came out in 2015, looking to be a better replacement for standard vpn solutions like IPsec or OpenVPN. Many VPN providers like ProtonVPN default to use wireguard but can still fall back to the older tunneling technologies. Wireguard uses UDP instead of TCP which does not enforce message ordering, which is preferred because there are security attacks/vulns that can bind up TCP messages by damaging a single message cause it to not read following messages until it is resent. In 2020, wireguard was added into the linux and android kernels. Its popularity came from its ease of installing a single program and setting a simple toml config file compared to the complexity of setting up other VPN solutions.
https://www.wireguard.com or https://en.wikipedia.org/wiki/WireGuard
Installation
Lots of sites say wireguard is simple to setup, but I ran into quite a bit of issues on my first attempt. Once it actually started routing packets through the tunnel, it was worth the effort and I understand the confusion I had. Hopefully this guide explains a bit more about what we are going to be building.
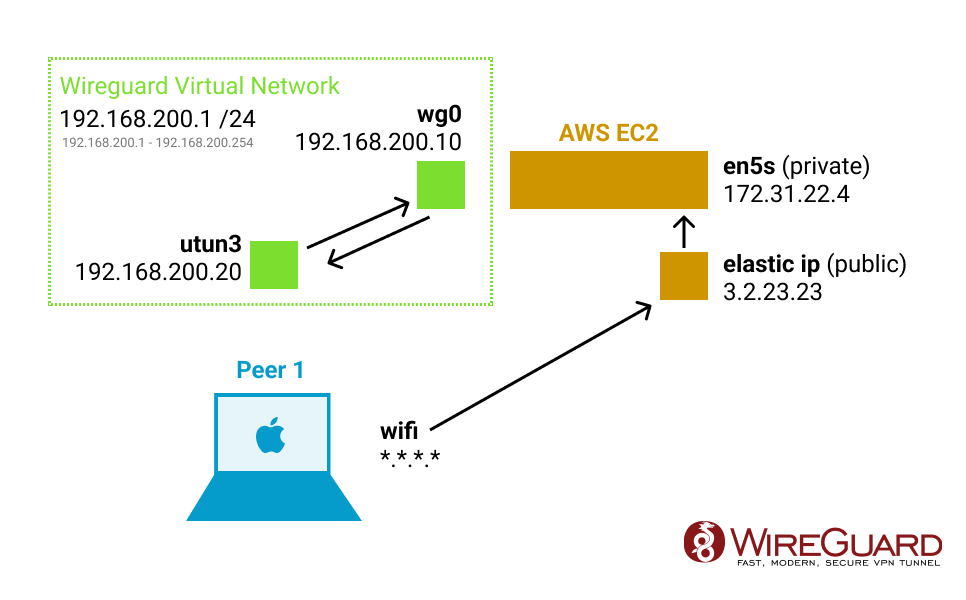
Wireguard is going to create a new network interface on all devices that will have static IPs to talk to each other on a new virtual network. We will use an EC2 with its public IP to open a UDP port (defaults to 51820) that one or more peer devices will connect to.
You have a choice if you want to do Full Tunnel (all traffic will get sent through) vs Split Tunnel (only the virtual network will get tunneled). For my use, I just want a split tunnel to do things like ssh and mysql connection. So I have an on-demand tunnel in the background but it only starts when I try to use ssh or mysql. It usually connects in just a few seconds.
Some people rather use this as a full VPN tunnel in which you can set all traffic (0.0.0.0/0) to tunnel through. It even has a nice option where you can exclude certain wifi like your home and office networks. But be careful with bandwidth usage, AWS charges $0.09/GB (so 100GB a month would be $9 which isn’t bad but will also probably have a ~100mbps speed due to the ec2 instance unless you are running a large instance).

Setting up EC2 Linux Host
On AWS, we will need to setup a security group with port 51820 (you can also use any other port you want, just use that number in the config as well).
https://us-east-2.console.aws.amazon.com/ec2/home?region=us-east-2#SecurityGroups:
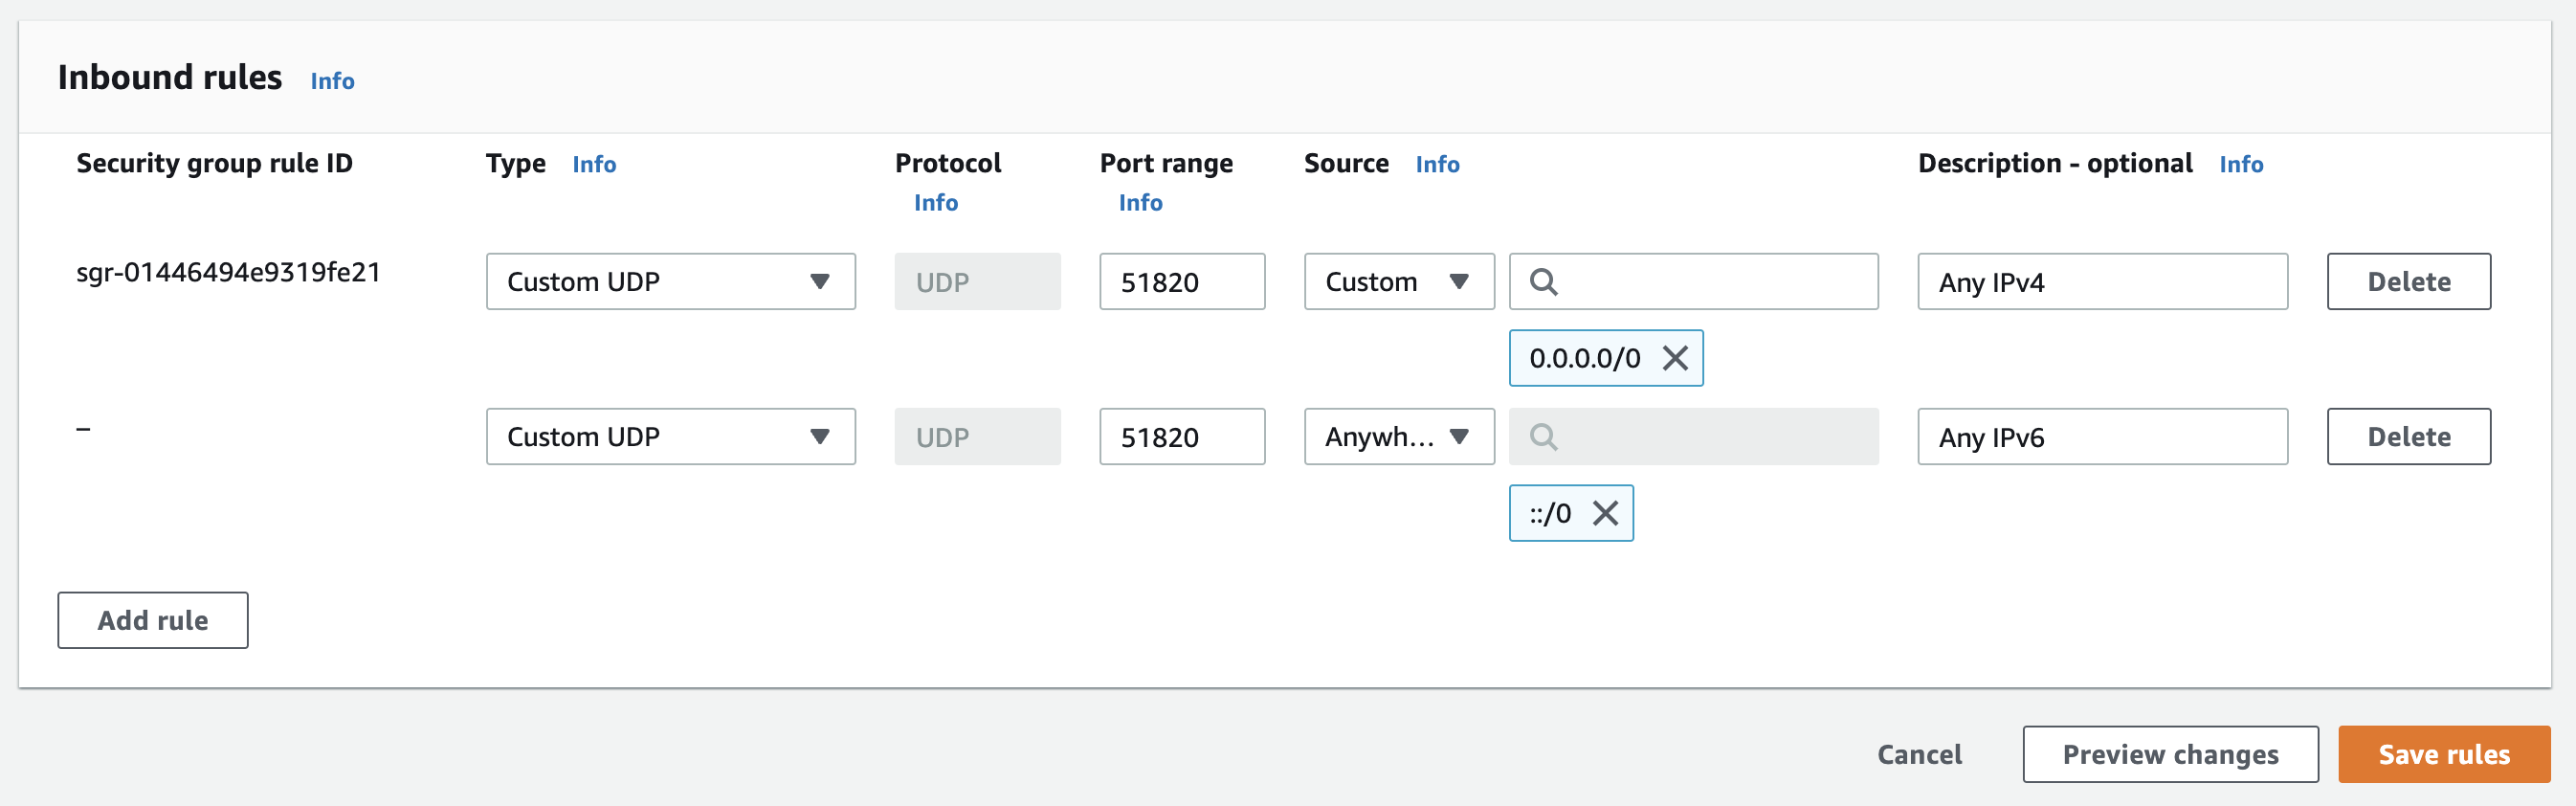
Make sure that you specify UDP instead of TCP or the tunnel will get handshake did not complete error in the log.
You can probably just add the IPv4 rule, unless you have gone through the trouble of enabling IPv6.
On the EC2 you will need to install wireguard and generate the public/private keys:
sudo apt install -y wireguard
sudo mkdir /etc/wireguard
wg genkey | sudo tee /etc/wireguard/private.key
sudo cat /etc/wireguard/private.key | wg pubkey | sudo tee /etc/wireguard/public.key
wg genpsk | sudo tee /etc/wireguard/client1.presharedkey
Next we need to setup the config file sudo vi /etc/wireguard/wg0.conf
[Interface]
Address = 192.168.200.10/32
ListenPort = 51820
PrivateKey = <value from /etc/wireguard/private.key>
PostUp   = iptables -A FORWARD -i %i -j ACCEPT; iptables -A FORWARD -o %i -j ACCEPT; iptables -t nat -A POSTROUTING -o ens5 -j MASQUERADE;
PostDown = iptables -D FORWARD -i %i -j ACCEPT; iptables -D FORWARD -o %i -j ACCEPT; iptables -t nat -D POSTROUTING -o ens5 -j MASQUERADE;

[Peer]
# First Device Name
PublicKey = <public key generated by the client, you have to wait until after you setup client to get this>
PresharedKey = <value from /etc/wireguard/client1.presharedkey>
AllowedIPs = 192.168.200.20/32

[Peer]
# Second Device Name
PublicKey = <public key generated by the client, you have to wait until after you setup client to get this>
PresharedKey = </etc/wireguard/client2.presharedkey>
AllowedIPs = 192.168.200.30/32
Setting up a Client
Next we need to setup a client, install the client for the OS that you wish to use. https://www.wireguard.com/install/
Once installed, create a new blank tunnel.
[Interface]
PrivateKey = <autogenerated>
Address = 192.168.200.20/32

[Peer]
PublicKey = <value from /etc/wireguard/public.key>
PresharedKey = <value from /etc/wireguard/client1.presharedkey>
AllowedIPs = 192.168.200.1/24
Endpoint = <public ip of ec2>:51820
At this point, you have the public key of the client, and will need to go back to the server to add it to the wg0.conf file. Once the public keys are set, you will be ready to start wireguard.
sudo wg-quick up wg0Now on the client, try to start the tunnel from the menu.
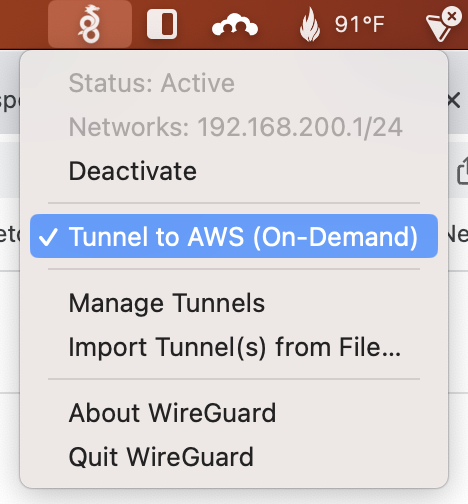
Now try to ping the 192.168.200.10 from client.
Word of warning, just because it shows a green active status on the client doesn’t mean a tunnel is actually working. Check the log or on the server side check sudo wg to see if the lastest handshake actually succeed.
Additional
Now once you get this started you probably want this to always run (like after a restart). Do a sudo wg-quick stop and then run this command to setup the system job. The wg0 should come back up on its own.
sudo systemctl enable wg-quick@wg0.service
sudo systemctl daemon-reload
Troubleshooting
One annoying thing is the clients show a green Active dot even when a successful tunnel hasn’t been started. You have to look at the logs to see if an error occurred. Wireguard is a real “best-effort” network.
Double check your firewall rules are set to UDP (not default TCP) and the port number matches. Most of my issues stem from this.
If you are using AWS for your server, make sure your Security Group looks like:

Matomo SMTP through Amazon SES
bz2 File Compression

I'm a 35 year old UIUC Computer Engineer building mobile apps, websites and hardware integrations with an interest in 3D printing, biotechnology and Arduinos.